Unless you live next door to a bike store or have a significant
other who loves bike maintenance it's a good idea to know how to fix a
flat tire on a bike. If you get a flat on the way to work or
while running an errand, you will usually be late. Fixing a flat
is a skill you should learn sooner, rather than later. Just a
tiny bit of planning can make the difference between arriving late, or
not at all.
Fortunately, the problem of fixing a flat tire is not a very serious one.
You will find that it takes about half an hour when you are not used
to doing it frequently, and 15 minutes when you do it often (such as
when you have several children who get flats seemingly on the same
ride). Fortunately a 10 year old can be taught to fix a
flat.
Required Tools
To fix a flat on the road, you need the small handful
of supplies pictured above, you should be able to get all of them for
under $30. If you bicycle as a family, not every bike needs a
complete kit, but if you use your bike for errands or commuting be sure
not to leave home without these items.
Four items are essential: 1) a good
lightweight air pump, 2) a set of tire levers, also sometimes called tire
"irons" (usually made of plastic), 3) a patch kit, most preferably one designed
for bicycle tires, and 4) a spare tube.
If your bike does not have quick releases on
the wheels, 5) a wrench that fits the axle nuts may be necessary.
Sometimes you can get some very cool tools (some are even named
"Cool Tool") that combines the wrench and several other bike
tools in a single package.
Why are the patch kit and the spare tube both necessary? I've
found it's sometimes quicker to patch a tube than replace it, especially
when you can find the damaged portion and patch the tube without
removing it from the wheel.
However, other times a tube can
not be patched due to a torn seam, multiple holes, or a damaged valve,
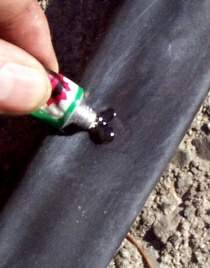
or large cuts. Occasionally, (all too often actually) your glue will have dried up. Dried glue is
the bane of a cyclists existence. Occasionally you will see tubes of glue on sale
separately from the rest of the patch kit. Snap them up. Once a tube of glue is
opened, it is more likely to dry out, as it is no longer perfectly sealed. After a
few months, it will be useless.
Types of Flats
Sometimes the flat will happen overnight or while the bike is parked. This
usually happens when it's time to go home, and it's dark and
raining. This is your indication that you have not pleased the
bicycle gods, and you have not been riding enough. What ever you
do, don't take it as a sign you should ride less.
At other
times, you will become aware of the tire is getting flat when riding.
Your steering may get squishy (sorry, that's as technical a definition
as I can come up with). Or you may just notice it's hard to pedal.
Occasionally, the tire will deflate very quickly, perhaps even blow out.
Usually you will know exactly what caused the problem because it
will still be protruding from your tire.
The hardest leak to fix is a very slow small one because locating the
tiny hole can be difficult. These are usually caused by small
pieces of glass just barely protruding thru the tire into the
tube.
Inspecting the Tire
 When
you get a flat on the road, first get the bike well off of the
road and in a safe and comfortable location, and look to see if you
can find the hole from the outside of the tire. When
you get a flat on the road, first get the bike well off of the
road and in a safe and comfortable location, and look to see if you
can find the hole from the outside of the tire.
Sometimes it helps to turn the bike upside down and
stand it on its seat and handlebars. The wheel can be slowly turned while looking
for signs of a puncture, or protruding glass etc.
Quick Repair
 If the puncture is found by
visual inspection and is not too
close to the valve, it's often possible to repair the injury without taking the wheel off
of the bike. (If the puncture is near the valve this is harder because
the valve stem will get in the way). If the puncture is found by
visual inspection and is not too
close to the valve, it's often possible to repair the injury without taking the wheel off
of the bike. (If the puncture is near the valve this is harder because
the valve stem will get in the way).
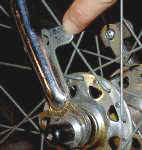
First, take two of the tire levers and insert them (both on the same side of the tire)
between the tire and the rim about two to inches on either side of the puncture.
Use the thin end of the tire lever for this. The tire levers will be
sticking out beyond the tire initially, but in the next step we will
pry the tire over the rim and it will end up looking as pictured
above.
Prying with both of the levers
at once you can pop the edge of the tire off of the
rim. Then you can slide the levers farther apart (first one side than
the other) to pull just enough tire off of the rim to reach in and
pull out the damaged part of the tube. Don't lose track of the puncture. Some tire levers have hooks on the
end for hooking into a spoke, as shown above. This gives you a free hand.
If you are able to find the puncture by this method, you probably
don't have to remove the tire completely, so you can now jump down to "Patching the Tube."
Removing the Wheel
 If the
puncture can't be spotted by visual inspection, or, you decide to
replace the tube, it is necessary to completely remove
the tube from the tire. If the
puncture can't be spotted by visual inspection, or, you decide to
replace the tube, it is necessary to completely remove
the tube from the tire.
The first step is to remove the wheel from the bike.
If it is the rear wheel, shifting the chain onto the smallest rear
sprocket will give you some chain slack to work with.
Either pop open the quick releases
or use your wrench to loosen
the nuts. A rear tire may have to be pushed towards the front of the bike before it
will lift off.
Note the arrow in the picture at right, above. Grab the derailer body and
swing it
toward the rear of the bike. Don't try to move the lower pulley (which is at the
top-right of the photo because the bike is upside down). Instead, look for the upper
pulley, and grasp there, and swing that joint toward the rear of the bike. You will
see that this will pull the chain out of the way so you can lift the wheel directly out
(and stay cleaner in the process). Remember this trick when it comes time to
re-install the wheel.
The front wheel will comer right off once you have opened the quick
release or removed the nuts with a wrench.
Getting the Tube Out
Once the wheel is off the bike, remove the tire following the directions
under Quick Repair, above. It's easier if you begin opposite the valve
with the tire irons. Completely loosen the one side of the tire
all the way around. Leave the other side of the tire alone.
Then pull the tube completely out. The valve stem sometimes is
difficult to remove, but by pulling open the tire you should be able
to get it out.
Before you remove it, take note of the orientation of the tube in the tire. This
may save time finding the leak in the tube if you discover the source of the puncture in the next
step, inspecting the casing.
Inspecting the Tire Casing
 Before doing anything else, use your fingers to
inspect the inside of the tire casing. (Be careful for sharp
objects protruding from the tire casing). Carefully
and slowly run your fingers around the inside of the tire feeling for
anything that does not belong there. Before doing anything else, use your fingers to
inspect the inside of the tire casing. (Be careful for sharp
objects protruding from the tire casing). Carefully
and slowly run your fingers around the inside of the tire feeling for
anything that does not belong there.
Sometimes
you will quickly find a staple or nail, or shard of glass that caused the flat.
Other times, the object that punctured the tire will be
gone. If you do find anything, pull or dig it out from the tread
side of the tire, not the inside.
But it's important to always inspect the casing anyway because if
you skip this step, you will very often have another flat within a
very few miles.
Finding the hole by Inflation
If you can't find the hole by visual inspection, try inflating the
tube a bit with your pump. The tube should inflate in spite of its
leaks. If not, it is probably too damaged to be repaired.
Pump the tube until
it is larger than its original diameter (somewhat stretched). Then
hold it near your ear and listen for a hiss as you rotate the
tire past your ear. If the puncture is large enough, you
may be able to feel the air rushing out if you hold it near your
face. However, if the puncture
is tiny, I may need to splash some water on the tube or hold the tube under water to find
the leak. |
 Sometimes, you will find a
long or deep cut in the casing. Very often patching the tube and
continuing to use a gashed casing will result in another flat, quite probably in less than a
mile. Often you can apply your largest patches to the inside of the tire casing,
and thereby get hundreds of more miles out of the tire. Other times, gashed tires
are too far gone to be salvaged. To get home, a favorite cyclists trick is to place
a dollar bill, folded in half or quarters between the tube and the tire, so that it covers the gash in
the tire. Paper money has very high bursting resistance. Sometimes, you will find a
long or deep cut in the casing. Very often patching the tube and
continuing to use a gashed casing will result in another flat, quite probably in less than a
mile. Often you can apply your largest patches to the inside of the tire casing,
and thereby get hundreds of more miles out of the tire. Other times, gashed tires
are too far gone to be salvaged. To get home, a favorite cyclists trick is to place
a dollar bill, folded in half or quarters between the tube and the tire, so that it covers the gash in
the tire. Paper money has very high bursting resistance. |
If the leak is very tiny, only an occasional bubble will escape when the tube is
held under water, but then this type of leak seldom forces a repair on
the road. You could just pump it up and ride home. Being
observed giving your inner-tubes a bath in the ditch seldom does much
to enhance your image as a cyclist.
 Once the puncture is found, be careful not to lose
sight of its location. Some patch kits include a piece of chalk or pencil to mark the
spot, some cyclists carry a ball
point pen to circle the hole, and make a mark on the tire in the corresponding position
for careful inspection when done patching. Once the puncture is found, be careful not to lose
sight of its location. Some patch kits include a piece of chalk or pencil to mark the
spot, some cyclists carry a ball
point pen to circle the hole, and make a mark on the tire in the corresponding position
for careful inspection when done patching.
On some occasions, it is possible that there may be two punctures.
This is especially true if you run into a curb or stone. This is
called a snake bite, because side of the rim will pinch the tire
leaving two holes that look like a snake bit the tire.
If you find one leak, don't assume that's the end of it. Further, patching a tube and sticking it back into a tire that still has a foreign object
embedded in it will result in another flat almost immediately.
Patching the Tube
When patching the tube, the following precautions must be observed.
First, the tube must be clean and dry; water and glue don't mix.
Second, the tube must be roughed up a little, using a little tool included in the patch
kit; the glue won't bond well to a smooth or dusty tube. Just
use the bit of sand paper or the mini-file to scuff up the area around
the puncture. Scuff an area slightly larger than the patch
you intend to apply. Don't get crazy with the scuffing. |
 |
Unless you are using the newer glueless
patches (see below), you must apply and spread a
little glue - just enough to get the surface wet -- and wait until it almost dries.
This glue spot must cover an area slightly larger than
the patch. It's
important to rub the glue around in a little circle just bigger
than the patch. This gives the glue a chance to mix with the
rubber, and form a layer of softened rubber that will bond with the patch.
This is how the glue works, it just softens the rubber so that it
can stick to another piece of rubber. The glue itself is not
really an adhesive. This process is called vulcanization. |
 |
| If it does not seem tacky enough, you may want to add and spread a little additional glue, and allow it to dry a little.
Patching with the glue too wet and runny leads to poor quality patch jobs.
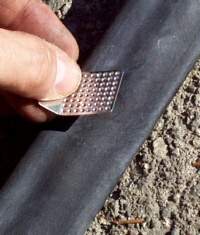
Note that
the patches pictured have a clear plastic backing and a thicker plastic covering the glue
side. Peel the thick plastic from the patch, and place the patch on top of the
drying glue. (Sometimes it's a good idea to apply a drop of
glue to the glue side of the patch and rub it around and let it
get tacky).
|
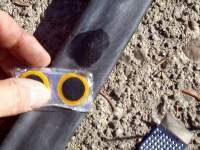
Two patches showing glue spot just a bit bigger
than the patch. |
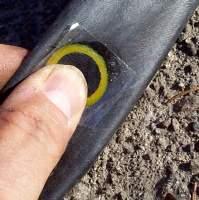
| As soon as you apply the patch press it down strongly with your
thumb and HOLD it tightly for a minute. It is not necessary to
remove the thin plastic backing plastic from the patch. In fact, it is better to
leave it on, as shown here, because it keeps the edges of the patch from sticking to your
fingers.
Remember, the pressure is important, you are actually driving
the molecules of softened rubber of the tube and the patch into,
around, and between each other. The tighter you press the better the patch will
hold.
Before putting the
tube back onto the wheel, inspect the patch carefully to see that it has sealed all the
way around. If a gap is found that is not sealed a small
drop of glue can be used to seal it tight. |
Click here
for a larger image of a finished patch. |
 Glueless patches: Glueless patches:
There are several brands of glueless patches, the best are by "Park". These still require
cleaning and roughening the tube surface, but there is no glue to spread.
Simply peel off the backing, and apply as described above. These do require an
absolutely dry tube. Don't try to patch in the rain. Glueless patches work
better on mountain bike tires than on high pressure road bike tires. They look like
a thin piece of clear plastic, but they do work quite well. They are not usually as
long-lasting as other patches, but some cyclists have gotten hundreds of miles out of
these patches.
|
Putting the Tube Back In the Tire
If you are doing the quick repair, stuff the tube back into the tire, making sure it's
not twisted or unduly stretched, use the tire levers to pop the tire back into place, and
re-inflate the tire. Some of the directions below may be necessary, however.
| If you have had to remove the entire tube, the task is somewhat more
difficult. Often a tube with just a little air in it to be easier to install than a
completely empty tube, especially when installing a new tube. If the tire is not
still partially on the wheel, first put one side of the tire one the rim, all the way
around. Then maneuver the valve stem between the rim and the tire and into the valve hole.
Be sure to do this FIRST, or it will be difficult to get the valve
stem into the hole. |
 |
| After making sure the valve is correctly in the hole,
start tucking
the tube into the tire all the way around, keeping it from getting twisted.
Some
tubes will have to be stretched slightly to fit; others will seem slightly too
long. Just distribute the tube evenly around the tire. It's very important to avoid
kinks, folds, and twists. |
 |
Putting the Tire Back On the Rim
 Now that the tube is in, it's time to finish putting
the tire on. Sometimes it helps to put the wheel in your
lap, (unless
the tire is dirty). Or you may find it easier to hold the wheel with
the valve up and opposite end against the ground. Now that the tube is in, it's time to finish putting
the tire on. Sometimes it helps to put the wheel in your
lap, (unless
the tire is dirty). Or you may find it easier to hold the wheel with
the valve up and opposite end against the ground.
It's easier to seat the tire at the
valve first, pushing the valve stem back into the valve hole just a
little ways, to allow the tire to fit between the stiff base of the
valve stem and the rim. Then you can pull the valve back out of
the valve hole and the stiff base of the valve will hold the tire in
place as you seat the rest of the tire working your way around the
wheel.
Start seating the tire around the rim,
using both hands -- and not the tire levers -- to pop the bead of the tire
(the lip) into the cavity of the rim.
With many mountain bike tires, you may never need tire levers to re-install a tire.
You
can often do it all by hand, pushing the last segment with both thumbs. It's
recommend
you try it this way first, as using tire levers can actually cause
punctures if you pinch the tube with them.
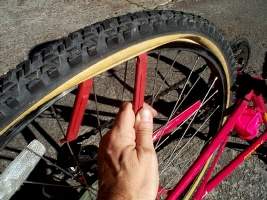
However, you will often have to use the levers to re-install the
tire if the job begins
to be difficult. Start using the tire levers again, inserting
them where the tire is properly in the rim, and sliding them around
the tire so that the un-seated bead gets smaller. Eventually you
will end up with a small segment (as pictured above) where the last
little bit of tire remains outside the rim. This is the most
difficult part. You need the tire levers here.
Warning: Watch those tire levers. You can easily "pry" a hole
into your newly patched tube. Be very careful not to allow the tip of the tire lever
to apply any pressure against the tube. This is tricky, because you can't always see
what is happening inside the tire.
Finally, before pumping air into the tire, go all the way around the wheel, pinching
the tire from both sides.
Peek into the gap between the rim and the tire. Looking for places where the tube is sticking out between the bead of the tire and the
rim. You must poke the tube back into the tire if you can see it in the gap.
Often two or three strokes of the pump will assist in this task by adding just
enough air to give the tube some shape. If you let the tube stay between the tire
bead and the rim, sooner or later you will have the most spectacular blow-out (it can
sound like a gun shot) and your tube will be totally unsalvageable with a long rip.
Pumping it Up
 Now
it's time to re-inflate the tire. Before you start, see if
you can figure out how too release your brake cable tension. There are many different
kinds of brake cable releases and we can't show all of them
here. If you can't find your brake
release or if it requires tools to release the brake tension, then follow the steps under
"Attaching the Wheel" BEFORE you pump it up.
Reason: The tire may be too fat to fit between the brakes when
inflated. Now
it's time to re-inflate the tire. Before you start, see if
you can figure out how too release your brake cable tension. There are many different
kinds of brake cable releases and we can't show all of them
here. If you can't find your brake
release or if it requires tools to release the brake tension, then follow the steps under
"Attaching the Wheel" BEFORE you pump it up.
Reason: The tire may be too fat to fit between the brakes when
inflated.
First pump enough air back in to get the tire slightly firm, usually no more than
8 or 9 strokes of the hand pump. Then look where the tire meets the
rim, and follow the rim all the way around the tire.
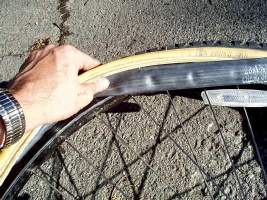
Is the tire evenly seated on the rim? Does it seem to be
deeper in the rim in some spots than others? (This is easy to tell if
your sidewalls are a different color as shown in the picture
above). If it's not even, readjust the tire by pulling it
sideways slightly, first to one side then the, other. Push with your
thumbs against the side wall and pull with your fingers over the top
of the tread. If this fails to even out the depth to which the tire
sits in the rim, let some air out and try again. When the rim is next to the bead all the way around the tire
it's time to fully inflate the tire.
Be careful with hand pumps like the one shown here. You should not put too much
force on the valve stem, as you can sheer it off. It's best to "hang" the
tire on the pump as shown in this picture, then hold the pump only, never applying force
to the tire, just let it hang there with its valve stem pointing
DOWN into the pump.
 If working at home, you may have the luxury of a floor
pump. This makes the work much faster, and many have a built in
gauge. If working at home, you may have the luxury of a floor
pump. This makes the work much faster, and many have a built in
gauge.
Remember to read the
inflation pressure from the side of the tire and inflate to no more than that pressure.
(Well, if the truth were known, many cyclists use a little more
pressure than the sidewall says because it reduces rolling
resistance. You should never be tempted to go above 110% over
the side wall rating, and even then, only on fairly new tires.)
Without a gauge, how do you tell when there is enough air in the tire? Feel the
firmness of the OTHER tire, and pump the patched one till it's about the same firmness.
If you still can't judge, apply a fair amount of your weight to
the top of the Other tire and compare how much it squashes down where
it meets the road. Adjust the repaired tire to match. You can
buy a small tire pressure gage at bike stores which is small enough to
take along in your bike bag.
Hand pumps in general are just barely adequate to the task, and it takes a lot of pumping to
get the tire inflated. It is slow going requiring many many
strokes, but the smaller the hand pump the less strength it takes.
Remember that it's better to spend a few extra
minutes than it is to start out with too little air in the tire.
Doing that could cause
another snake-bite flat on the first bump you hit.
Attaching the Wheel
 Remember
that above we told you that if you
inflated the tire before you mount the wheel on the bike that you may have to loosen your brake cables in order to get
it back on. This is usually accomplished with cable releases on one of the brake pad
arms. Just squeeze the brakes together and pull the brake cable out of the slot with
the little tab on the end. There are many different brake release
systems, but all usually have a cable release somewhere. If worse comes to worse, and you can't release your brake tension enough to get the
tire back in, just deflate it and pump it up after you mount the wheel. If you release your brake tension, be sure to restore it before
riding. Remember
that above we told you that if you
inflated the tire before you mount the wheel on the bike that you may have to loosen your brake cables in order to get
it back on. This is usually accomplished with cable releases on one of the brake pad
arms. Just squeeze the brakes together and pull the brake cable out of the slot with
the little tab on the end. There are many different brake release
systems, but all usually have a cable release somewhere. If worse comes to worse, and you can't release your brake tension enough to get the
tire back in, just deflate it and pump it up after you mount the wheel. If you release your brake tension, be sure to restore it before
riding.
Some bikes come with bumps where the front wheel attaches (left
photo below), others come with metal wheel retainers (right photo).
These
are called lawyers lips, or lawyer clips (among other things). Both systems are designed to prevent the front wheel from falling off of
you fail to tighten the front quick-release. Neither method works well.
Either of these systems make the
front wheel more difficult to attach. Higher quality bikes often
do not have these features.
Note that due to these silly inventions, you have to loosen the quick release much
more than would otherwise be necessary when removing the wheel, and this sets you up for a
mistake when re-installing the wheel. Make sure you get the quick release above the
bumps, or the metal clips fully engaged on the stud before you tighten the quick release.
See "How
To use a Quick Release".
On the rear wheel, the chain makes for a more difficult
re-installation of the wheel. It will be easier if you make sure the chain is on the smallest sprocket as you ease the tire
into place. Remember to rotate the derailer out of the way as
was explained above.
Be sure to carefully bolt the wheel back on or to
Properly lock
the quick releases. A common problem after reinstalling a tire
is for the rear wheel to start rubbing against the left-side stay. It
might look right when you mount it, only to start rubbing after a few
pedal strokes. This is because the rear quick release was not
tight enough and your chain pulled the right side of the axel forward,
turning the wheel to the left. You have to get off the bike,
loosen the quick release, straighten the wheel and tighten it more
firmly.
Before you get back on the road, check your brakes to
make sure that the quick releases or cables have been properly
reattached. Pickup your tools, and the old tube if you replaced
it. Not only because you don't want to litter, but also because
there are several good uses for old bike inner tubes.
Keeping an Eye On It
After installing a tire and riding away, watch it carefully for a while.
Sometimes there is more than one leak, and sometimes you can cause
another leak by rough use of the tire levers. It's disheartening
to have to stop and patch all over again, so remember to be careful
with the tire levers. Ride home to your floor pump or to the
nearest bike shop and check your tire pressure with a proper
gauge.
Avoid gas station air hoses. The gauges are seldom
accurate. They are also set for car tires (25 to 30 pounds)
which is not usually sufficient for bikes, - OR - they are set
for trucks (125-150 pounds) and will blow the tires right off your
bike. (No, I'm not exaggerating, I've seen this done).
Patching tires is a hassle, and it's dirty work. Once you do it, you
will gain two things: The first is new confidence of being able
to handle the situation by yourself. The second is an uncanny
ability to spot broken glass by the little twinkle it reflects while
you are JRA. (Just Riding Along).
|