Bicycle wheels on better bikes come with a device called a quick release which holds
the wheel on. These are used because you then do not have to carry tools to remove
the wheel. It seem people are often removing bike wheels, to fix a flat, or fit the
bike into a car, or to keep someone from stealing it.
Quick releases are simple to operate, and you wouldn't think a web page dealing with
them was warranted. Wrong! Bike shop owners will tell you it is one the most
commonly miss-adjusted part on a bicycles owned by people new to cycling.
That wouldn't be so bad, if it wasn't so dangerous to misuse quick releases. If
not properly used, the front wheel can fall off, and you crash. Hard. Usually
head first.
So lets take a quick look at a quick release and explain how it works.
It's really
simple, and remarkably secure when used correctly.
By their very nature, it is almost impossible for a quick release to work itself open.
Personally, I always disbelieve anyone who says "it just popped open".
They way they are designed, it takes more force for the quick release to open
than it does for it to remain securely shut. All the bumps in the world will not jar
them open. The only way they "just pop open" is if they are never properly
closed.
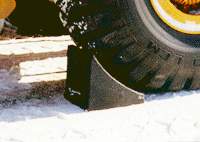 The quick release operates like the wheel-chocks you will see
careful truck drivers place around behind the wheels of a truck parked on a hill.
The chock might be only 4 inches high, and the truck might weigh 10,000 pounds, but that
little 4 inch bump becomes an insurmountable object precisely because
the truck is heavy. It takes a great deal of energy to lift 10,000 pounds 4 inches. The quick release operates like the wheel-chocks you will see
careful truck drivers place around behind the wheels of a truck parked on a hill.
The chock might be only 4 inches high, and the truck might weigh 10,000 pounds, but that
little 4 inch bump becomes an insurmountable object precisely because
the truck is heavy. It takes a great deal of energy to lift 10,000 pounds 4 inches.
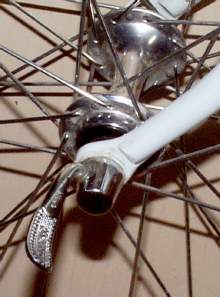 The quick release has a little chock (called a cam) built into it. It has
to climb over the top of its chock every time you open or close it. The cam is built
into the silver end-cap where the lever attaches. The quick release has a little chock (called a cam) built into it. It has
to climb over the top of its chock every time you open or close it. The cam is built
into the silver end-cap where the lever attaches.
Wrong Way
Here is the common mistake that many people make when first encountering quick
releases.
They un-screw the quick release. They use the lever like the handle of a wrench,
and rotate in around and around till the quick release is tight or loose depending on
whether they want it on or off. Wrong!
Right Way
First, note that the quick release handle is slightly curved. Almost all of them
are built this way. Further, one side of the handle often has the word
"open" and the other often says "closed". When the curve is
pointing away from the bike (and the word open is visible) the quick release is loose, and
your bike is unsafe. The picture above shows the quick release in an Open state.
Not safe to ride.
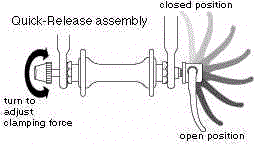 To close the
quick release swing the lever (see drawing) so that the curved handle points to the bike
or the wheel, and the word "closed" is visible. You swing the
lever like a door, you don't twist it or rotate it. To close the
quick release swing the lever (see drawing) so that the curved handle points to the bike
or the wheel, and the word "closed" is visible. You swing the
lever like a door, you don't twist it or rotate it.
The lever swings about 180 degrees.
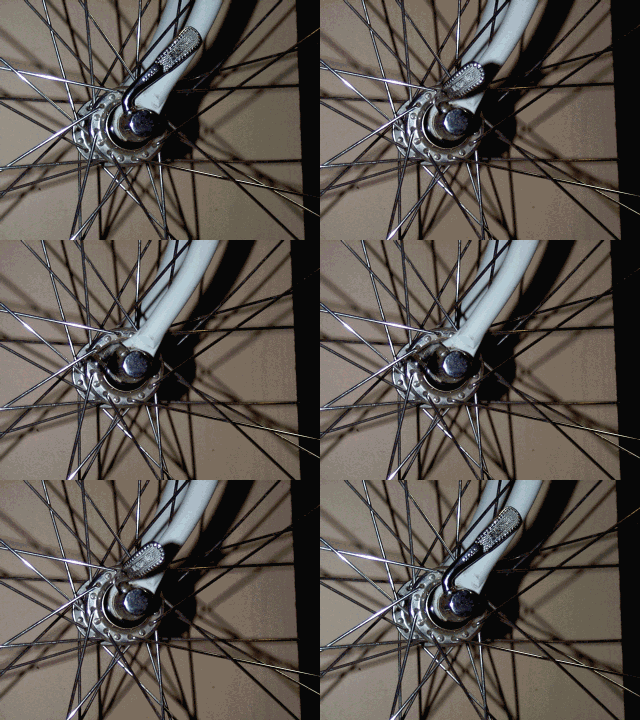
When swinging the lever from full open, to full closed, you should JUST start to feel
some resistance when the lever is pointing straight out (sideways or perpendicular) from
the wheel. This resistance should start getting harder at about the 2/3s way closed,
and really hard up to the 3/4 point (still 1/4) open. Then it may get easier the
rest of the way. Your lever has climbed "over the top" of its cam and is
sort of rolling down the back side of its little wheel chock.
Note, that some brands just get progressivly tighter, and there is no perceptable feel
of "going over the top".
How Tight is Tight Enough?
When the lever leaves a mark in your hand after closing it, it's probably tight enough.
The mark should not be bloody - lets not get crazy here... ;-) An indentation
that lasts more than 5 or 10 seconds usually means you have pressed hard enough.
Preliminary Tuning
What if you don't feel any resistance, or you feel resistance even when
it's wide open?
In either case your quick release needs to be adjusted.
Resistance when wide open
If your lever binds up or becomes hard to swing and it is still in the wide open
position (the word Open is showing) then you have to unscrew (lefty-loosie, righty-tighty)
the lever a bit. Now you may use the lever as if it were the handle of a wrench,
(without fear of being laughed at) and unscrew it a half turn at a time, then try swinging
the lever, then unscrew a bit more, till you get it so the resistance just starts to set
in with the lever sticking straight out from the bike.
Resistance never felt, easy to swing from open to closed
In this case, you have to tighten the lever. First open it all the way.
Then start rotating the lever like it was a wrench, and swinging the lever every half turn
or so, until you just barely feel resistance when it is sticking straight out. If
it is really loose, you may have to reach around to the other side of the bike wheel and
hold onto the other end of the axle to keep the quick-release end-cap (or nut) from
spinning. (Sometimes it's easier to just spin the nut with your fingers while holding
the lever straight out. When the nut gets hard to turn, you are near the proper
adjustment.).
Final Positioning
After you get the resistance dialed in so it just starts getting tight with the lever
at the 90 degree mark (sticking straight out from the wheel), grab the nut (other side of
the wheel) with one hand, and the quick release with the other, (flip the lever to the
full open position) and rotate the two together so that when you close the lever it
will be pointing rearward, or parallel to the fork.
Warning: We are into religious territory now. There are people who feel
quite strongly about the orientation of quick release levers.
On a bike used only on the road, as long as it is tight it can be pointing any which
way. It really does not matter. On a bike you will ride off-road through
brushy trails, point them rear-ward so a branch does not catch it and flip it open, as
might happen if it were pointing forward. I said "might" happen.
Never has happened to me, or anyone I know, but you hear stories....
Some folks like to align the quick release lever so that (when closed) it will be
parallel to a solid piece of the bike, like the fork or chain-stay. This allows them
to grab the release lever and the fork and really squeeze the two together. It also
makes it harder to get your wheel off when you want to, because you can't get your hand
behind the lever to pull it out. If you have small hands this technique may help,
but if you have a weight-lifters grip, this is unnecessary, you putting more stress on the
system than is necessary, unscrew a quarter turn and try again.
Nuts Vs Quick Releases
Quick releases are by far more reliable than nutted axles. Nuts will unscrew over
time, but quick releases will not. The quick release is actually stretching the rod
(skewers) that runs through the hollow axle to the nut on the other side. This
stretching puts a great deal of pressure on the quick release nut on the other side, which
has little teeth next to the bike frame. These little teeth dig in and make it
impossible for the nut to come loose.
Regular nutted axes, on the other hand can work loose over time, unless they rust,
which unfortunatly, they do.
But this safety benefit of quick releases only comes into play by virtue of the camming
action, so if you have previously used that quick-release lever as a wrench, you now know
why that was the wrong way to do it.
|
